Showing posts with label pendants. Show all posts
Wednesday, October 8, 2014
Polymer Clay Tutorial: Mica Shift Mystery Pendants
This is my third in a series of Mica Shift technique tutorials. I'm fascinated by the Mica Shift effect, and as this tutorial uses an extruder as a primary tool, it's got to be one of favorite methods. The Mica Shift technique can replicate a 3D-like illusion, some people call it Ghost Image, which seems appropriate this month for Halloween. I hope you will try my new tutorial, it's lots of fun, and makes a great weekend project, just click on the link below!
Mica Shift Mystery Tutorial
Saturday, September 21, 2013
Shabby Chic Polymer Clay
Vintage Rose Pendant & Earring Set
Stop in & see them in my Etsy shop Beadazzle Me Polymer clay Jewelry.
Saturday, October 20, 2012
Polymer Clay Miniature Pendants
| Humming Bird Pendant |
| Bronze & Turquiose Swan |
| Peacock Feather & Brocade These pendants are currently available in my Etsy Shop Beadazzle Me |
Wednesday, September 26, 2012
Polymer Clay Faux Dichroic
My latest experiments involve the use of some scraps leftover from other projects. I carefully save the little bits between layers of wax paper, and store them in plastic file drawers. Last weekend I decided it was due time to find out what was lurking in those secret drawers. What I discovered was a scrap pile consisting mostly of my favorite colors, purple, lavender, turquiose, & various blue-green shades. Here are the results of my weekend foraging:)
Most of these pendants are available in my Etsy ShopBeadazzle Me
Thursday, August 23, 2012
Polymer Clay Tutorial: Mica Shift Swirl
Introducing my newest tutorial "How to Create Mica Shift Swirl Pendants". This is the 5th tutorial I have written about Polymer Clay techniques. It contains 51 photos & step-by-step instructions (30 pages) that guide you through the process. The tutorial also includes a bonus section, explaining how to make the matching earrings, and how to add the earring/pendant findings.Below are a few different variations on the same technique. If you are interested in my tutorial it is available in my Etsy Shop: Beadazzle Me
Friday, June 22, 2012
Making a Pendant Setting
Currently, I'm working on designing some pendant settings, to use with small cabochons. I'm making my own molds with Premo clay, by impressing found objects, then cutting them out with metal shape cutters. I used a mix of Premo metallic clays to make the pendant setting above. After I baked it I applied some Burnt Umber to give it an antique look. A few dabs of Treasure Gold added the highlights.
Now, I'm trying to decide what color cabochons to make as the insert. Here is a Turquiose, Metallic Tan, & White abstract cab. Whatever cabochon I use, I'll put a thick coat of resin on it to give it a fabulous shine.
![]() |
Silver clay with black accents, cabochon added |
Saturday, March 31, 2012
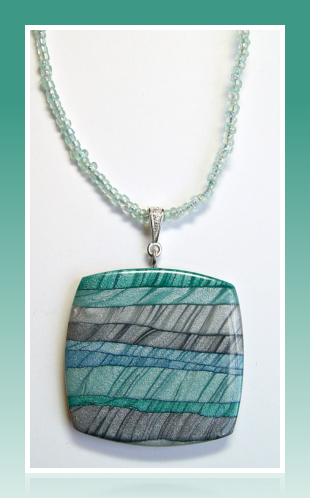
Polymer Clay Tutorial: Mica Shift Pendants
Mica Shift Tutorial
My New PDF File Tutorial is finally complete!
Click on the link above to view it.
This is 4th Polymer Clay tutorial
that I have made available in my
Etsy Shop, Beadazzle Me.
This tutorial will guide you step by step,
how-to create Polymer Clay Mica Shift Striped Pendants, it includes 30 pages of easy to understand instructions, and 53 color images.
Directions are also printed right on the photos,
so you may choose to follow the photos only,
for an easy, photo by photo version of the tute..
Suitable for use by Beginner's, Intermediate to
Advanced level clay artists, will also enjoy it.
Here are a few examples of my
completed Mica Shift jewelry
The Resin tutorial below is a companion tutorial to this one
How to Apply Resin to Polymer Clay Pendants
My New PDF File Tutorial is finally complete!
Click on the link above to view it.
This is 4th Polymer Clay tutorial
that I have made available in my
Etsy Shop, Beadazzle Me.
This tutorial will guide you step by step,
how-to create Polymer Clay Mica Shift Striped Pendants, it includes 30 pages of easy to understand instructions, and 53 color images.
Directions are also printed right on the photos,
so you may choose to follow the photos only,
for an easy, photo by photo version of the tute..
Suitable for use by Beginner's, Intermediate to
Advanced level clay artists, will also enjoy it.
Here are a few examples of my
completed Mica Shift jewelry
![]() | |||
| Mica Shift Technique Earrings |
| Gray/Silver/Gunmetal Pendant |
| Sea-breeze Pendant |
![]() |
| Mica Shift 1" Pendants |
The Resin tutorial below is a companion tutorial to this one
How to Apply Resin to Polymer Clay Pendants
Thursday, January 26, 2012
New Polymer Clay Tutorial
This tutorial illustrates how to apply a 2-part resin coating to the top surface of 3 Different Types of Pendants:
• Flat, smooth pendants, Steps 1-12
• Raised textured pendants, Steps 13-15
• Curved Pendants, Steps 16-19
• Adding a second coat of resin, Steps 20-21
I just released my third Tutorial, I thought I'd never finish this one! It has 35 pages & 61 Photos. The photos are close-ups, so you can easily follow the step by step format. The reason I decided to write this particular tutorial is that I've had so many customers & folks on my fan page ask me "How do you get that shine on your pendants"? Now, you can find out the steps I take to get that great domed effect & fabulous shine on the most difficult to cover projects like the Raised Surface Pendants, I make in my Cabochon Pendant Tutorial! This is the way I found that works best for me, and I get perfect results every time.
You can find my newest tutorial in my Etsy Shop Beadazzle Me
• Flat, smooth pendants, Steps 1-12
• Raised textured pendants, Steps 13-15
• Curved Pendants, Steps 16-19
• Adding a second coat of resin, Steps 20-21
I just released my third Tutorial, I thought I'd never finish this one! It has 35 pages & 61 Photos. The photos are close-ups, so you can easily follow the step by step format. The reason I decided to write this particular tutorial is that I've had so many customers & folks on my fan page ask me "How do you get that shine on your pendants"? Now, you can find out the steps I take to get that great domed effect & fabulous shine on the most difficult to cover projects like the Raised Surface Pendants, I make in my Cabochon Pendant Tutorial! This is the way I found that works best for me, and I get perfect results every time.
You can find my newest tutorial in my Etsy Shop Beadazzle Me
Saturday, November 5, 2011
Just Let Your Creativity Flow
Polymer Clay Daily Just Let Your Creativity Flow
I've discovered something lately, when I just lose myself in what I'm creating, it seems to come out better. In other words, I don't plan the design beforehand, I just let it happen! Whatever clay scraps or canes are in front of me, that's what I use, it's a very relaxed approach. Most of the time I have the TV on, I am a big fan of I Love Lucy, so I watch a few of those episodes on the DVR, or there's always something interesting on HGTV too. This new, more relaxed attitude does have it's drawbacks, most of the time I have no idea how I made the piece- lol!
My latest project involves layering, with translucent clay, rainbow foils, and pearl canes made with Premo metallics.
After I bake the pendant & it’s hot out of the oven, I plunge it in a bowl of ice water. This seems to help with the clarity of the final product. After that, I start my sanding! I usually use about 3 different grades of wet sandpaper. I always follow that with a vigorous buffing on a microfiber dish towel. To complete the look I add a coating of Enviro-tex lite resin.
Creativity is allowing yourself to make mistakes. Art is knowing which ones to keep. ~Scott Adams
I am thrilled to be featured on Polymer Clay Daily by Cynthia Tinapple! Thank you, I am honored to be included with so many talented polymer clay artists.
I've discovered something lately, when I just lose myself in what I'm creating, it seems to come out better. In other words, I don't plan the design beforehand, I just let it happen! Whatever clay scraps or canes are in front of me, that's what I use, it's a very relaxed approach. Most of the time I have the TV on, I am a big fan of I Love Lucy, so I watch a few of those episodes on the DVR, or there's always something interesting on HGTV too. This new, more relaxed attitude does have it's drawbacks, most of the time I have no idea how I made the piece- lol!
My latest project involves layering, with translucent clay, rainbow foils, and pearl canes made with Premo metallics.
After I bake the pendant & it’s hot out of the oven, I plunge it in a bowl of ice water. This seems to help with the clarity of the final product. After that, I start my sanding! I usually use about 3 different grades of wet sandpaper. I always follow that with a vigorous buffing on a microfiber dish towel. To complete the look I add a coating of Enviro-tex lite resin.
Creativity is allowing yourself to make mistakes. Art is knowing which ones to keep. ~Scott Adams
I am thrilled to be featured on Polymer Clay Daily by Cynthia Tinapple! Thank you, I am honored to be included with so many talented polymer clay artists.
Friday, November 4, 2011
Striped Metallic Pendants
This is what I'm working on in my studio right now. I love anything that goes with Denim! Jeans are my everyday uniform:) This distressed-look pendant is perfect with the latest torn, or holey jean style, that is so popular right now.
All of these pendants are available in my Etsy Shop Beadazzle Me.
Sunday, March 20, 2011
Neo Victorian: Cross Pendants & Winged Hearts
Neo-Victorian Cross Pendant & Winged Heart Cross Necklace are available
in my Etsy Shop
Beadazzle Me.
Sunday, February 27, 2011
Garden Inspirations...Flowers & Butterflies
![]() |
| Click on photo to see a larger view |
and let your creativity flow...
Native Florida Plants that Attract Butterflies Many beautiful native Florida plants have the added advantage of attracting butterflies, the most attractive of all winged insects. Since butterflies usually migrate long distances, they require frequent stopovers for food and rest.
Our front garden is full of Butterfly
attracting flowers. I just love to watch them fluttering around, the dogs
are absolutely mystified by them too.
If your interested in my jewelry designs,
you can find them in my Etsy Shop
It's the Marketplace for everything Handmade:)

Thursday, January 27, 2011
Misty Moon Pendants
New Misty Moon pendants made with Premo Clay in a soft Heather shade. I used a Mica Shift striae technique to give the Moon dimension. The back of the pendant is a Mica Shift flower pattern done in a Grape/Purple color. I made my own Bezel setting out of silver clay with a carved Mica Shift design.
Tuesday, January 11, 2011
What's New for 2011- Black & White Bangle
I love making Bracelets! Black & White with a hint of Limey-Olive is one of my favorite color schemes! This bangle was made using Kato clay because it's so strong & it polishes up so nicely too! I used a large cookie cutter for the center of the bracelet & a flexible tissue blade to cut the outside curves. Lots of sanding & a couple coats of poly-varnish to finish.
![]() |
| My Bracelet won Second Place in Voila! March 9, 2011 |
Monday, November 8, 2010
Polymer Clay Discoveries in Mokume Gane & Mica Shift Techniques
I'm currently working on a series of cabochon pendants using the mokume gane and mica shift techniques. These are 2 of my favorite techniques to explore, the combination's and color palettes are limitless. Of course, I love working with Premo Metallic clay, I really think it performs the best, especially with mica shift applications. I'm also experimenting with Pardo Translucent Art Clay, it has a crystal-like clarity that I haven't found in other brands. Using extremely thin layers of the Pardo Translucent, silver leaf, and some of my unique Mica Shift canes to create a cabochon with more depth & sheen. I must admit I have this terrible habit of not writing down the different techniques I create and then wondering how in the world I did it!
Below are a few pics of the process, making up my metallic color blends, the impressed mokume gane sheet.
Subscribe to:
Posts (Atom)